Managing Link Inspections
5.1 Pausing Link Inspection
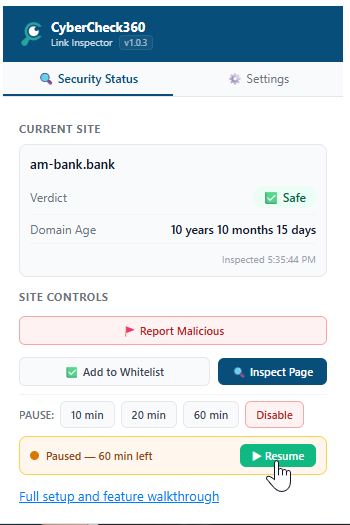
- Open the popup → Security Status tab.
- In the PAUSE row, click 10 min, 20 min, or 60 min.
- A countdown appears (e.g. "Paused :10 min left") along with a green ▶ Resume button.
- Checking restarts automatically when the timer runs out.
To resume early, click ▶ Resume at any time.
While paused, you can still check the current page manually by clicking Scan Page in Site Controls.
5.2 Disabling Link Inspection
From the popup:
- Open the popup → Security Status tab.
- Click Disable in the PAUSE row (shown in red).
From the browser's extension manager:
Chrome: Go to chrome://extensions → toggle CyberCheck360 Off.
Firefox: Click the menu (☰) → Add-ons and Themes → toggle CyberCheck360 Off.
 Chrome
 Firefox
5.3 Re-enabling Link Inspection
After a timed pause: Checking restarts automatically. Click ▶ Resume to restore it earlier.
After clicking Disable: Open the popup and click Enable or Resume Inspection.
After turning off via the extension manager: Go back to the extension manager and toggle CyberCheck360 back On.
Ready to add click-time protection to your email security stack?
See how CyberCheck360 closes the gap that advanced phishing attacks exploit.
5.4 Using the Right-Click Context Menu.
CyberCheck360 adds a quick-access menu to your browser's right-click options. You can access all key controls directly from any webpage without opening the extension popup.
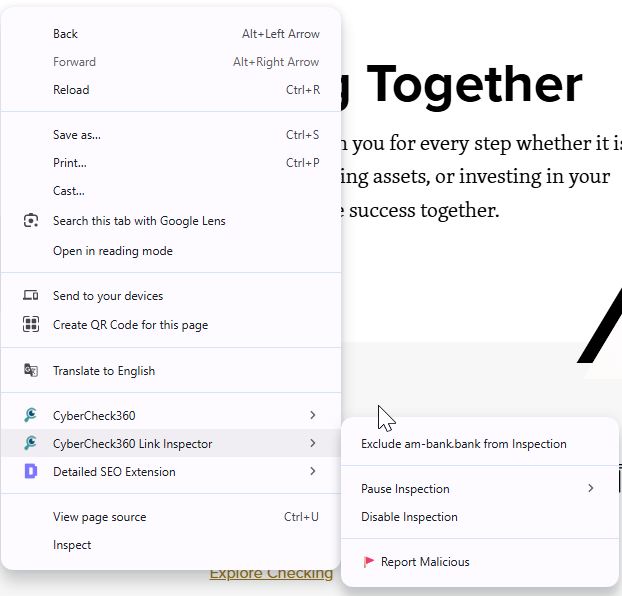
To open it, right-click anywhere on a webpage → hover over CyberCheck360 Link Inspector in the context menu.
The following options are available:
Exclude this domain from Inspection
Stops CyberCheck360 from checking the exact domain you are currently on. For example, if you are on shop.example.com, only that specific address is excluded.
Use this when you regularly visit a site that triggers warnings but you are confident it is safe — without needing to open the popup.
This has the same effect as adding the site to your Whitelist. You can manage or remove excluded domains via the popup → Settings → Manage Whitelist.
Pause Inspection
Temporarily stops CyberCheck360 from checking any sites. This is the same as clicking a PAUSE duration in the popup - inspection resumes automatically or when you click Resume.
Disable Inspection
Turns CyberCheck360 off completely until you manually re-enable it. No time limit applies. Use this only when you need to turn off checking entirely for an extended period.
Resume Inspection
Turns checking back on immediately. This option appears in the right-click menu when inspection is currently paused or disabled. Click it to restore protection without needing to open the popup.
5.5 Whitelisting a Domain
Whitelisting marks a site as trusted so it is never checked again — no domain age warning, no blacklist check, no phishing check, and no download interception.
To whitelist the site you are currently on:
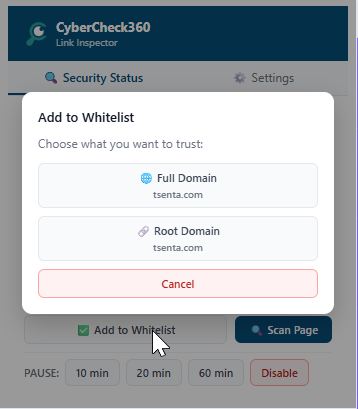
- Open the popup → Security Status tab.
- Click Add to Whitelist under Site Controls.
- A prompt asks: "Choose what you want to trust:"
- 🌐 Full Domain: Trusts only this exact website (e.g.
example.com). - 🔗 Root Domain: Trusts the main domain and every sub-address under it.
- 🌐 Full Domain: Trusts only this exact website (e.g.
- Make your selection and confirm.
We recommend choosing Full Domain. Choosing Root Domain trusts every subdomain automatically, including ones you may not have visited or verified. Full Domain keeps you in control.
To view or remove whitelisted sites:
- Open the popup → Settings tab.
- Click Manage Whitelist.
- Click Remove next to any site to stop trusting it.
5.6 Adjusting the Domain Age Threshold
This setting controls how old a domain needs to be before CyberCheck360 considers it established. The default is 365 days.
- Open the popup → Settings tab.
- Make sure Show warning for new domains is turned On.
- Click Edit next to the threshold label.
- Enter any value from 0 to 365 days and save.
Keeping it at 365 days gives you the widest protection. Lowering it means fewer warnings, but you may miss some risky sites.
5.7 Blocking Access to Unsafe Sites
By default, a Proceed Anyway (Not Recommended) button is shown on all threat warnings, giving you the option to continue regardless. To remove this option:
- Open the popup → Settings tab.
- Under Warning Behaviour, toggle Allow access to malicious sites to Off.
- On any threat warning, only Go Back or Return to Safety will be available.